Showing posts with label Restricted Diet. Show all posts

Saturday, July 18, 2009

Cuckoo for Kuku

My Amazon order for a Persian cookbook called "New Food of Life: Ancient Persian and Modern Iranian Cooking and Ceremonies" finally arrived -- thanks for the gift certificate Min! -- and I dove into the recipes immediately.

The friend who presented me with a cooking challenge recently unloaded several pounds' worth of dried beans on me. It seemed appropriate, therefore, to look up some Persian dishes using beans.

One of the simplest recipes I found was for kuku, which is a type of Iranian dish resembling the Italian frittata or the omelet. According to the cookbook author, Najmieh Batmanglij, "a good kuku is thick and rather fluffy."

There are over a dozen variations on the kuku in the book. I can't post Batmanglij's recipes here without her permission, but I can generalize it for you here. [Note to AP: This is an Option #2 recipe.]

Basic Kuku Recipe
Serves 8
  1. All the kuku recipes begin with chopped onions (or shallots or chives or scallions) and minced garlic being softened, not browned, in a skillet with oil or butter.
  2. Preheat the oven to 350°F.
  3. Remove the skillet from heat and add your preferred fillings -- cooked lima beans and chopped fresh dill in this instance -- and the entire mixture is transferred to a baking dish. (I like using a round pie plate for this recipe.)
  4. In a separate bowl, lightly whisk together 3-4 eggs, a dab of yogurt and salt & pepper to taste.
  5. Pour the egg mixture over the first mixture in the baking dish. Gently give it a brief stir to distribute the eggs because they will bind everything together.
  6. Bake in a 350°F oven for 30 min, brush the top with oil, then bake another 30 min or until the top is golden like a quiche.

Thursday, July 2, 2009

Sweet and Sour Stuffed Chicken

As I was reading Persian cookbook reviews on Amazon, I was struck by one post that complained about chefs who overplay the exoticism of their ethnic cuisine by adding far too many obscure ingredients and making a recipe more difficult (and thereby inaccessible) than necessary. It's a kind of cultural snobbery to keep foreigners at bay. This complaint was from an Iranian who insisted that his/her family makes traditional dishes using simple grocery store items that should be available pretty much anywhere.

I was grateful for that feedback because I wouldn't know what makes a Persian dish "authentic". However, I can say that the same complaint applies to the glut of Japanese cookbooks out there. If a Japanese Canadian who knows her way around Asian groceries can't get her hands on a certain ingredient, then what is the point of even publishing such a book?

I adapted the Persian Sweet and Sour Stuffed Chicken recipe posted at the Mage Publishers site to accommodate the restricted diet I'm following. Apart from some minor changes, there wasn't much I needed to do to simplify the recipe. It takes a bit of time to prepare because of the number of things that need chopping or filleting, but it is not at all difficult.

Sweet and Sour Stuffed Chicken
Serves 6-8

6-8 chicken breasts, boneless, skinless
1 Tbsp light olive oil
1 large onion, finely chopped
2 cloves of garlic, minced
1 cup prunes, pitted and finely chopped
1 cup dried apricots, finely chopped
1 baking apple, diced
¼ tsp freshly ground black pepper
¼ tsp saffron, steeped in 2 Tbsp of hot water
1 tsp honey
juice of 2 oranges

  1. Butterfly and pound each breast to an even thickness.
  2. In a large pot, heat the olive oil at medium heat. Add the onion, garlic, prunes, apricots, and apple. Don't allow anything to sear; just heat through gently.
  3. Add the pepper, saffron with water, honey and the juice of one orange. Lower the temperature and allow the mixture to soak up the moist ingredients for about 10-15 min.
  4. Preheat the oven to 350°F.
  5. Place a ¼ to ½ cup of the stuffing mixture in the middle of each chicken fillet and wrap the meat around it. To hold it together, truss the the stuffed breasts with kitchen twine as shown above.
  6. Place the stuffed breasts in a roasting pan and pour the remaining orange juice over them.
  7. Bake for 1½ hours or until the chicken meat has reached at least 180°F. Baste the breasts frequently with the juices that have run off and mixed with the orange juice.
  8. To serve, remove the twine and slice into cross sections.

Chilled Cucumber Soup

Persian cuisine is relatively new territory for me -- one that I am excited to learn more about. Having an Iranian friend who cooks her native dishes effortlessly and intuitively is a good way to start. However, I can't keep imposing on her for information, so I went on a hunt for a good online resources.

The good peeps at Mage Publishers -- an indie publisher of Persian literature and cultural books -- have generously posted a few recipes from Najmieh Batmanglij's "New Food of Life" and her other cookbooks in the Mage catalogue. (Note: "New Food of Life" was described by some reviewers on Amazon as being the best English cookbook on Persian cuisine, so I promptly ordered it today.)

By coincidence, the first recipe on the Mage page is for a Yogurt and Cucumber Dip/Soup (Mast-o khiar) which is ridiculously similar to a Scandinavian recipe for a chilled cucumber soup that I wanted to try. It just goes to show you that we all live in a tiny global village.

I modified a couple of ingredients to suit the restricted diet I've been following. I also have the good fortune to have successfully grown herbs from seed, including dill, sweet marjoram, basil, and lemon basil. This may not sound like a big deal to you, but I am the grim reaper of plants and the fact that any greenery has lived under my care is a miracle of biblical proportions. Anyway, the fresh dill was a great addition to this dish. [Note to AP: This is an Option #1 recipe.]

Chilled Cucumber Soup
Serves 4

¼ cup shallots, coarsely chopped
1 English cucumber, peeled, seeded and diced
2-3 cups plain yogurt (depends how thick you like it)
1 Tbsp fresh mint leaves
1-2 Tbsp fresh sprigs of dill
salt and pepper to taste
3 Tbsp walnuts, chopped *optional for garnish
½ cup raisins, soaked and drained *optional for garnish

  1. In a large bowl, combine the shallots, cucumber, yogurt and herbs.
  2. Puree the mixture until relatively smooth. (Note: the cucumber flesh will give it a porridge-like texture, which is what you should be aiming for.)
  3. Season with salt and pepper.
  4. Chill until ready to serve. Garnish with walnuts or raisins if desired.
Note: the mint will turn black if not eaten right away. This doesn't impact the flavor too badly, but it isn't as pretty as when it is green. If this is a concern, add chopped mint only at serving time.

Thursday, June 25, 2009

Japanese-Style Curry

Before anyone starts lecturing me that curry is Indian in origin, let me reassure you that I know that. The word itself originates from the Tamil word "kari". The spice mixes that we know as "curry" are South Indian inventions.

The fact that a spice-averse culture such as Japan has adapted its own version of the curry sauce is a testament to the dish's immense appeal and undeniable deliciousness. In fact, the Brits have done the same. Of course, only the Japanese would find a need to tone it down a bit, making a mild or sweet version to suit their own delicate palates.

Every Japanese kid has had the curry that comes in the Glico box (yes, that's the same Glico company that makes the world famous Pocky sticks -- now offered in more than a dozen flavors). You just heat up some onion, chicken, carrots, potato and water in a pot then throw in the cubes of Glico curry roux, and you magically end up with a thick, creamy stew that tastes brilliant with a bowl of white rice.

For decades I have made Japanese-style curry in this way, never realizing how absurdly easy it is to make my own "karee" (カレー) roux, even under certain dietary restrictions. Better yet, this means I can also have fun customizing the flavors.

[Note to AP: This is an Option #2 recipe.]

Japanese-Style Curry
Serves 6-8

2½ Tbsp curry powder
½ cup oat flour
4-6 Tbsp light olive oil

2 chicken breasts, skinned, deboned and cubed
1 medium onion, sliced
2 small carrots, coarsely chopped in rounds
2 cups okra, stem caps removed
1 tsp grated fresh ginger
1 tsp minced garlic
2½ cups vegetable or chicken stock
½ Tbsp curry powder
½ tsp garam masala
  1. In a skillet, lightly heat the 2½ Tbsp of curry powder and oat flour over medium heat for about a minute.
  2. Add the olive oil and rapidly stir it into the dry ingredients. If necessary, add more oil only until just enough to yield a brown paste. Heat the paste through, stirring constantly to avoid burning. After a minute or two of stirring, remove from heat. Set aside.
  3. Throw into a large pot the chicken, onion, carrots, okra, ginger, garlic and stock. Bring to a boil and immediately lower the heat to a simmer.
  4. As the pot simmers, skim off any foamy scum that forms at the surface and discard. The scum consists of impurities -- mostly from the chicken -- that have floated up. Don't let the scum get mixed back into the liquid because it will impact the taste.
  5. Add the remaining curry powder and the garam masala to the pot.
  6. Mix in the paste from the skillet and gently stir the pot.
  7. Continue simmering until the stew becomes thick and creamy, at least 30 min, or longer to allow the flavors to infuse. Check that the chicken has cooked through.
  8. Serve with rice.

Wednesday, June 24, 2009

Blueberry Yogurt Tartlets

Oddly enough, it started with chicken pot pie.

Still following the rules of a strict diet, I tried to devise a recipe for chicken pot pie without cream, butter, shortening, puff pastry, or any wheat-based flours. The filling was fairly intuitive to figure out. But the flaky, golden pie crust was going to be a bit of a challenge.

Pie crust is basically flour, salt and/or sugar, butter / shortening / lard (i.e. fat), and ice cold water. While I'm not an expert baker, I have made enough pies in my lifetime to have attained a modest mastery of the pie crust. And if there's anything I know about pie crusts is that you don't muck around with the fundamentals. Baking is a science -- getting the chemistry wrong makes the difference between light pastry and rock-hard dough.

As I've said before, non-wheat flours are relatively new to me. I've come to like oat flour in particular because of its nutty taste and grainy, crumbly texture like in shortbread. I decided that a sablée ("sandy") crust would be a palatable alternative to the flaky crust.

However, I wasn't sure if substituting light olive oil for butter would work. So I needed to test it out first in a simpler recipe.

I had seen the Yogurt Tartlets recipe posted on 101 Cookbooks and appreciated the fact that the custard was made of (light) yogurt and eggs -- ingredients that are allowed in the diet -- and yet somehow still turns out creamy even in the absence of heavy cream. Heidi's recipe uses maple syrup as a sweetening agent, but I replaced that with mild honey. I couldn't use her crust recipe because it is full of banned ingredients, so what better occasion to test out the oat flour crust I had in mind?

[Note to AP: This is an Option #2 recipe.]

Oat Flour Pie Crust
Makes 1 large pie crust or 7-8 tartlet crusts

1¼ cups oat flour
¼ tsp sea salt
2 Tbsp light olive oil
4-8 Tbsp chilled water
  1. In a large bowl, combine the oat flour and salt.
  2. Add the olive oil and stir it in a little.
  3. Add one tablespoon of chilled water at a time until all of the dry mixture is clumpy and moistened. The dough should be able to hold its shape when pressed into the shape of a ball. If it feels very sticky or runny then you have added too much water; compensate by adding a small amount of oat flour. If it is too crumbly to form a ball, then add a bit more water.
  4. Cover the dough with plastic wrap and chill it in the freezer for about 10-15 min. Chilled dough is always easier to roll out.
  5. With a rolling pin, roll out the dough on a flat surface until approximately twice the thickness of your pie tin, say the thickness of a dish rag. There's no need to flour the surface, as with conventional pie dough, but you will find that the dough is very crumbly and uneven. Don't worry about tears or holes because you can easily patch them by pressing down or smoothing some dough over the gaps.
  6. With a wide knife or a scraper, lift up what you can of the dough and lower it into your pie tin(s). Gently press down the dough into every corner of the tin and cut off the excess from the rim. Patch any holes. You can skip Step 5 and opt instead to press a wad of dough into the tin and smoothing it out by hand. However, this could yield a crust of uneven thickness, so beware.
  7. Refrigerate the crusts until ready to fill.

Blueberry Yogurt Tartlets
Fills 5-6 tartlets (I know this is inconvenient, like getting a package of 10 hot dogs with a package of 8 hot dog buns. I will try to adjust the quantities in the next version of this recipe.)

2 eggs
1 cup plain Greek (or Balkan-style) yogurt
¼ cup honey
zest of 1 lemon
1 Tbsp ginger juice (grate a ginger root then squeeze/strain out the juice)
5-6 Oat Flour Pie Crusts (see above) in tartlet tins
1 pint of fresh blueberries (or go wild and try other types of fruit)
  1. Preheat the oven to 350°F.
  2. In a large bowl, lightly beat the eggs.
  3. Add the yogurt, honey, lemon zest, and ginger juice. Whisk thoroughly until well combined.
  4. Fill the pie crusts no more than ¾ to the top. The custard will rise a bit during baking.
  5. Bake 20-30 min or until the crusts look dry and the custard doesn't jiggle too much.
  6. Allow the tartlets to cool.
  7. When ready to serve, top the tartlets with blueberries.

Monday, June 22, 2009

Salmon Chowder

The restricted diet that I am following does not allow for any clams or milk. Nevertheless, I was determined to make a seafood chowder. The clams were easily replaced by cubes of salmon. Replacing the dairy was a sketchy proposition, as it is a key component of any chowder.

I never liked milk substitutes and refused to drink them, despite being lactose intolerant. Soy milk puts me off with its cloying sweetness. Rice milk is thin like water. Fortunately, Natrel makes a brilliant lactose-free milk that actually tastes like milk. However, I've never tried to cook with the milk alternatives, and this was a good opportunity to experiment.

The result was a reasonable approximation to the lighter chowder soups. It could be thickened by pureeing some of the potato in the recipe. [Note to AP: This is an Option #1 dish.]

Salmon Chowder
serves 6

1 large fillet of salmon (roughly 3 portions), skinned and cubed
1 Tbsp light olive oil
1 cup of shallots, sliced
6 small red potatoes (the red potatoes look nicer, but I think white potatoes have a better, smoother texture which is appropriate for this dish), cubed
1 cup of fresh or frozen corn
½ tsp dried thyme
1 bay leaf
⅛ tsp red pepper flakes
½ tsp (or less) sea salt
¼ tsp ground black pepper
3-4 cups of rice milk
2 tsp lemon juice
  1. Boil the salmon cubes in water for 8-10 min or until cooked through. Drain and set aside.
  2. In a large pot, heat the oil at medium heat. Add the shallots and allow them to soften.
  3. Add the potatoes to the pot until heated through.
  4. Add the remaining ingredients to the pot and bring to a boil. Before it reaches a full, rolling boil, lower the temperature to allow the pot to simmer gently.
  5. Simmer an hour (or longer, if desired) to allow the flavors to infuse and the liquid to reduce.
  6. Serve with a wedge of lemon.

Sunday, June 21, 2009

Mini Lemon Poppy Muffins

The following is a recipe for Lemon Poppy Muffins that I adapted from a regular muffin recipe, replacing the flour and sugar with oat flour and honey. If you use "uncontaminated" oat flour (i.e. without any trace of gluten) and baking powder, this can be a gluten-free recipe. Make sure to use a mild honey so that the aromas don't overwhelm the light citrus fragrance. This can also work well with lime instead of lemons.

You can make these as regular-sized muffins, but personally I like mini muffins because they're bite-sized and cute. [AP: This is an Option #2 recipe.]

Mini Lemon Poppy Muffins
Makes 24

½ cup oat flour
1 Tbsp baking powder
¼ tsp baking soda
pinch sea salt
3 eggs
¼ cup honey
¼ cup light olive oil
1 Tbsp lemon (or lime) zest
1 Tbsp lemon (or lime) juice (optional)
1 Tbsp poppy seeds
  1. Preheat the oven to 350°F.
  2. In a large bowl, combine the oat flour, baking powder, baking soda and salt.
  3. In a smaller bowl, whisk together the eggs, honey, olive oil, citrus zest and juice (optional).
  4. Add the wet mixture to the dry and mix together until a smooth batter forms.
  5. Stir in the poppy seeds.
  6. Fill the muffin cups until slightly below the rim.
  7. Bake in the oven for 8-10 min or until puffed up and golden.

Monday, June 15, 2009

Easy Veggie Chili

Here is a meatless chili recipe I devised for the restricted diet. It tastes better the longer you let it simmer. For those days when you have the time but don't want to expend too much effort...

Easy Veggie Chili
serves 6-8
[Note to AP: This is an Option #1 recipe]

½ cup olive oil
4-5 shallots, sliced
1 green bell pepper, seeded and diced
1 red bell pepper, seeded and diced
1 zucchini, seeded and diced
1 can (32 oz) can chickpeas, rinsed and drained
2 large tomatoes, seeded and diced
1½ cups tomato juice
2 Tbsp chili powder
1 Tbsp fresh oregano or ½ tsp dried oregano
1 Tbsp fresh basil or ½ tsp dried basil
1 tsp ground cumin
2 Tbsp fresh cilantro, coarsely chopped
sea salt, black pepper and cayenne to taste
  1. In a large pot, heat the olive oil over medium heat.
  2. Add the shallots and heat until softened (but not browned).
  3. Add the bell peppers, zucchini and chickpeas until just heated through.
  4. Add the tomatoes, tomato juice, chili powder, oregano, basil, and cumin and stir until everything is evenly mixed.
  5. Lower the temperature, cover the pot, and allow to simmer gently for at least 30 min. Stir occasionally. I let it simmer for a couple of hours, which infused the flavors more intensely.
  6. Remove the chili from heat and add the cilantro and seasonings.

Sunday, June 14, 2009

My Shu Mai

Not long ago, I was watching Episode 36 of "Diary of a Foodie" which focused on "Fine Fast Food", i.e. cheap, quick eats across the globe that are good enough even for serious gourmands despite their pedestrian origins. One of stops included a Hong Kong noodle shop known for its wonton. In fact, its recipe is considered to be the perfect wonton.

My brother is the one in the family with an affinity for wonton, but I still found myself desperately yearning for some wonton of my own.

The hitch is, I am still following the rigid rules of a restricted diet, not so much for my own benefit, but to force myself to think more creatively in the kitchen. The diet doesn't let me combine meat with any forms of rice or wheat. Wonton or potsticker wrappers are of course made of rice or wheat flour.

My solution was to use collard greens as wrappers. The leaves are broad enough to wrap around a reasonably-sized dumpling. They are thick and hardy -- able to withstand a lot of handling and heat. When roasted, they caramelize a bit and yield a slightly sweet, mildly seaweed-like flavor.

My initial thought was to call them "Wanton Wontons" until I realized that my wrapper substitution would work better (and look better) in the form of shu mai. So here is the recipe for "My Shu Mai". If you come up with a better, cheekier name, please share!

My Shu Mai
Makes 24 dumplings
[AP: This is an Option #2 recipe]

1 package (approx 350-500g) ground turkey or chicken
1 egg
2 scallions
1 tsp rice vinegar
½ tsp sesame oil
¼ tsp sea salt
¼ tsp ground black pepper
2-3 Tbsp plain yogurt
⅓ cup rolled oats, ground up coarsely
6-12 large leaves of collard greens, stalks removed

NOTE: You will need a mini-muffin pan, which will help the leaves keep shape and are the perfect size for shu mai.
  1. In a large bowl, combine the ground meat, egg, rice vinegar, sesame oil, sea salt, and black pepper.
  2. In a smaller bowl, mix the yogurt and oats until it has the consistency of thick oatmeal. If too dry or crumbly, add more yogurt one spoonful at a time. If too liquid, add more oats a small amount at a time. This is the restricted diet's version of a panade: normally a paste made of milk and bread which is added to hamburgers, meat loaves, and meat balls so that they turn out tender and juicy.
  3. While the mixtures in the two bowls sit and marinate, cut round wrappers (approx 3" in diameter) out of the leaves of the collard greens. A small ramekin worked for me; you may have cookie cutters, cups or other round objects that you can trace around with a paring knife. Avoid the thick central veins of the leaves because it will be difficult to bend or fold around the dumpling fillings. Cut out 24 wrappers.
  4. Add the oat mixture to the meat mixture and blend until all ingredients are uniformly distributed.
  5. Preheat the oven to 375°F.
  6. If your mini-muffin pan isn't sufficiently non-stick, then lightly grease each slot with oil, butter, or whatever you prefer.
  7. In each slot of a mini-muffin pan, push in a collard green wrapper, and fill it with about 1 Tbsp of the mixed ingredients. Don't be concerned if a wrapper doesn't stay in its slot on its own; the weight of the filling will press it down. Don't stuff the filling past the edges of the wrapper.
  8. Put the pan in the oven and bake 20-30 min, or until the interior temperature of the dumplings reach at least 170°F.
Serve on their own or with chicken broth and vegetables (such as mushrooms, herbs, etc.).

Tuesday, June 9, 2009

Life Without Chocolate

This is Week 2 of my culinary challenge. One of the food items banned from the prescribed diet is chocolate. I know, I know... so many of us are drooling choco-holics who become choco-gasmic over a thick wedge of flourless chocolate torte, or a fragrant piece of Belgian chocolate truffle. The idea of being sentenced to an existence without chocolate borders on the cruel and inhumane.

To add salt to the wound so to speak, sugars -- both brown and white -- are also banned from the diet. How on earth does one still enjoy life without at least one sliver of sweetness?

That's when I remembered my very own Azuki "Brownie" Cheesecake recipe. It's a "brownie" without chocolate. It's the first semi-elaborate dessert recipe that was entirely my own creation and it was delicious to boot. Those who know me realize that I am the last person to toot my own horn, especially about my culinary abilities. For me to flaunt this success is an indicator of my absolute confidence in its delights.

If you stop to think about the root of chocolate (cacao) it begins with a bean. While the cacao bean is rather bitter -- biting into one is like gnawing on coffee grinds -- there are plenty of other bean varieties that are naturally sweet. Black beans are often used in the West as an alternative to chocolate in dairy-free dessert recipes, especially since it imparts a chocolate brown color when mashed. However, the sweet bean that is a staple across Asian kitchens is the azuki (or adzuki, or aduki) bean. It is a red bean that, IMHO, is equal to chocolate in its depth of flavor and versatility.

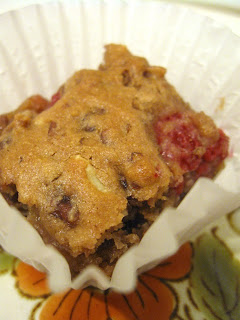
The cream cheese layer from my previous recipe had to be omitted due to further restrictions in the diet. Which left me with a rather dense, if lonely-looking layer of "brownie". It seemed necessary to add something bright to the mix. Raspberries were the first thing that came to mind, and so in they went. Walnuts would have been the ideal accompaniment to the azuki flavor, but the diet doesn't allow me to combine the two in the same dish. So I settled for almonds.

Azuki Raspberry "Brownies"
Yields 16 squares

1 can (approx. 520 g) Azuki beans*, mashed coarsely
½ tsp sea salt (unrefined) or less if preferable
½ cup oat flour, sifted
1 Tbsp baking powder
½ cup almonds, chopped or crushed
1 cup (½ pint) fresh raspberries, or thaw out frozen ones if necessary

*Note: some canned Azuki beans in Asian groceries have sugar and/or corn syrup added to them. If you are watching your sugar intake, check the label and pick a can that has the least amount of additives in the ingredient list, or use plain beans and control how much sweetener you add to it. However, my personal preference is to use the canned, "light" versions of the sweetened, whole (not mashed) Azuki beans. They are called Ogura-an (小倉餡) or Tsubu-an (粒餡).

1. Preheat the oven to 350°F.

2. Mix everything but the raspberries in a large bowl until well-combined.

3. Gently fold the raspberries into the batter, trying not to squash any of them.

4. Line a 9" square baking pan with parchment paper. Let about an inch of the paper to overhang from the edges of the pan -- this will make it easier for you to lift the cake out of the pan when it is ready.

5. Pour the batter into the pan.

6. Bake for 30 min or longer, depending on how soft you like your brownies. Note that as with any brownie recipe, there is a tendency for the cake along the rim of the pan to become spongey and bread-like in texture, whereas the middle pieces will tend to be more gooey like fudge. There's no right or wrong to this: it is entirely up to you. If you don't like a fudgey brownie, then jiggle or tilt the pan to see if the centre is still soft. If it is, the batter hasn't set, so leave it in the oven for another few minutes before you check it again.

7. Allow the cake to cool on a rack before trying to remove it from the parchment or trying to cut it.

[AP: This is an Option #2 recipe.]

Monday, June 1, 2009

Poached Chicken and Wild Rice Salad

Someone I know is dealing with a restricted diet that, incredibly, restricts almost all kinds of meats except for white chicken meat, white turkey meat, and pheasant/quail. Given that the latter are not readily available at the neighborhood supermarket, it boils down to the first two choices.

Another painful restriction is the banning of any kind of frying. With the early days of summer upon us, it's hard to imagine not BBQ-ing or at least frying meat. (My apologies to vegetarians and vegans everywhere.)

The solutions that came to mind were to poach, braise or stew those meats. Poached chicken -- if done right -- can be a delightful component of a summer lunch. Unfortunately, too many people make the mistake of over-cooking the meat, ending up with a rubbery, tough, and unpalatable piece of crap. So, my recipe instructions below leverage some of the research I've done regarding poaching techniques.

Poached Chicken and Wild Rice (or Quinoa) Salad
Serves 4-6

1 cup wild rice [Note to AP: I noticed after the fact that this should have been quinoa to make it a purely Option #2 recipe... OOPS]
2-3 chicken breast fillets, boneless and skinless (the number depends on the size of the fillets)
2 lemons
1 can (19 fl. oz.) red beans, drained and rinsed
2 green onions, chopped
½ cup almonds (raw or lightly dry roasted, as desired)
1 cup baby spinach (optional)
1 cup Almost Mayo Sauce

1. Add the wild rice (or quinoa) to a pot with the amount of water recommended on the package. Bring to a boil then lower the temperature to a simmer. Cover the pot with a lid and cook for the recommended length of time.
2. Slice one of the lemons into thick rounds. In a wide pot or skillet, lay down a single layer of the lemon slices. Place the chicken breast fillets on top of the lemon slices. Add just enough water to submerge the chicken. Weigh down the chicken with the lid of a smaller pot. Bring the water to a boil, then lower the temperature to a simmer. Cook until the internal temperature of the meat reaches at least 165°F (73°C), or until the interior is no longer pink. This may take anywhere from 5-20 minutes. The lemon slices keep the meat from overheating at the bottom. Shallow poaching (as opposed to poaching in lots of liquid) prevents the meat from losing flavor or moisture.
3. Either shred the meat by hand or chop them into thick slices. Place the meat in a large bowl. Add the red beans, chopped green onions, the zest of the remaining lemon, 1 Tbsp of the lemon's juice, and almonds (optionally the baby spinach too). When the wild rice (or quinoa) is ready, add to the bowl and mix all the ingredients gently.
4. To serve, provide the Almost Mayo Sauce on the side or drizzled on top.

White Bean Mash

The "White Bean Mash" from Marie Claire's "Easy" cookbook is one of my all-time favorite dips/spreads. I never knew how much I could love white beans until I had them this way.

I thought that this would be a quick, easy and flavorful addition to a restricted diet. However, white beans are not allowed to be combined with garlic for the patient I had in mind. I also felt that the original recipe called for too much olive oil. The following is my modified version with some proposed ingredient alternatives:

White Bean Mash

1 can (19 fl. oz.) white beans, drained and rinsed (or try 1-2 boiled or roasted parsnips)
2 shallots
½ - 1 tsp sea salt
¼ cup olive oil
1 Tbsp fresh thyme (or ¼ tsp of dried thyme)

1. Blend everything together in a bowl until it has the consistency of mashed potatoes.

Use as a spread, dip or serve with salmon, potatoes or wild rice. [AP: This is an Option #1 recipe and the serving suggestions are also Option #1.]

Almost Mayo Sauce

Not being able to use mayonnaise or most kinds of dairy in a creamy sauce is a major setback for a cook. The only options at my disposal are yogurt and eggs. Yogurt might work with the beet and potato salad, but it is no substitute for mayo.

Mayonnaise gets its characteristic flavor from eggs. For the novice, properly emulsifying the eggs and oil can get tricky -- batches of mayo have been ruined this way. One clever alternative I stumbled across in The Australian Women's Weekly "New Salads" cookbook uses hard-boiled eggs (not raw) to start a mayo-like dressing. This turns out to be a much more forgiving alternative. Their recipe for "Creamy Oregano and Caper" dressing involved a couple of other ingredients that were not suitable for the restricted diet I spoke about earlier, so here is my simplified version. [AP: this is a Neutral recipe. You can add fresh or dried herbs to it, but that can change the food category.]

Almost Mayo Sauce

2 hard-boiled eggs
2 Tbsp lemon juice (less if you don't like it too tart)
1 clove garlic
1/3 cup olive oil

1. Blend the eggs, lemon juice and garlic together.
2. With the blender still going, pour in the oil in a thin, steady stream until the sauce reaches a creamy consistency. Don't go beyond that point because your sauce may start to separate and break down.

Sunday, May 31, 2009

Cooking with Your Hands Tied

A dear friend has presented me with a cooking challenge: come up with something delicious (or at least interesting) while obeying some highly restrictive dietary rules. This friend is a fantastic cook in her own right, but she is now juggling some hefty responsibilities due to an illness in the family. When the doctor prescribes a strict diet that allows only certain food combinations and bans the majority of meat, seafood, dairy and grains, it's no wonder that even the best cooks would be stymied. Pity the poor patient who must be denied his comfort foods just when he needs it the most.

Fortunately, in this era of vegetarians, vegans, gluten-free, lactose-free, low-cal, low-sodium and other culinary constraints, there is an abundance of workarounds and substitutions that have been tried and tested. So without further ado, I hereby kick off the first of many recipes invented and/or customized for this challenge. I hope that they can also be universally appealing to those of you reading this blog.

Roasted Beet & Potato Salad
Serves 4-6

3-4 beets, preferably with greens attached
2 cups (or as many as you can hold with two hands) red baby potatoes
2 Tbsp olive oil
2 cups baby spinach (more if you don't have beet greens)
½ cup Almost Mayo Sauce
1 tsp sweet paprika

1. Preheat the oven to 425°F (220°C).
2. If applicable, separate the beetroot from the beet greens. Remove the red stems and coarsely chop the leaves.
3. Place the beetroots on tin foil and lightly mist them with water. Wrap the tin foil around the beets, creating a sealed environment in which they can steam. Place the wrapped beets on a baking pan or tray in case of leaks.
4. Put the baby potatoes in a baking dish and drizzle with olive oil. Lightly prick all the potatoes a couple of times to allow steam to escape while they bake. Cover the baking dish with tin foil and seal tightly.
5. Roast both the beets and potatoes in the oven for at least an hour, or until cooked through. While the root vegetables are roasting, do Steps 6-8.
6. If using beet greens, fill a pot with water and bring to a boil. Lower the heat to a simmer and add the chopped beet greens to the water. Blanch briefly until slightly wilted. Strain in a colander and squeeze out any excess water. Set aside and allow to cool.
7. In a bowl, stir the paprika into the Almost Mayo Sauce.
8. Toss together the beet greens (optional), baby spinach and the paprika-spiked Almost Mayo Sauce.
9. When ready, peel the roasted beets (rinse your hands often or use surgical gloves to avoid staining your hands!) and slice them as desired.
10. Halve or quarter any particularly large potatoes. Leave the small ones whole.
11. Add the sliced beets and baby potatoes to the mixed greens. Optionally, season with salt and pepper.

Note: This was inspired by the "Roasted Beetroot and Potato with Paprika Mayonnaise" recipe in The Australian Women's Weekly "New Salads" cookbook. However, my approach to cooking the root vegetables is different, I excluded bacon (which is not allowed in the prescribed diet), I added the beet greens, replaced arugula (not allowed in this food combination) with baby spinach since it can withstand some heat, and I replaced the mayonnaise (also not allowed) with the alternative sauce. [AP: This is an Option #1 recipe.]