Saturday, June 27, 2009

An Alphabet for Gourmets (1949)

It is with great regret that I confess total ignorance of M.F.K. Fisher (1908 - 1992) and her body of work up until today. She was not so much a "food writer" as a writer who thought a lot about food through essays and short stories. She published over twenty books and two volumes of journals and letters written in her unique style that led many readers to believe for a while that she was a man.

Fisher even produced a translation of Jean-Anthelme Brillat-Savarin's "The Physiology of Taste" in 1949. I've been reading the 1970 translation by Anne Drayton, which is perfectly competent but I wonder now what Fisher's interpretation must be like.

Gourmet magazine has republished a series of her essays online called "An Alphabet for Gourmets" -- a collection later printed as a book.

By chance, I stumbled upon her "S is for Sad..." segment. If you want to know what my book is about, I encourage you to read Fisher's take on the inextricable link between death, food and appetite.

"...underneath the anguish of death and pain and ugliness, hunger and unquenchable life are facts, shining, peaceful. It is as if our bodies, wiser than we who wear them, call out for encouragement and strength and, in spite of us and of the patterns of proper behavior we have learned, compel us to answer, and to eat."

Thursday, June 25, 2009

Japanese-Style Curry

Before anyone starts lecturing me that curry is Indian in origin, let me reassure you that I know that. The word itself originates from the Tamil word "kari". The spice mixes that we know as "curry" are South Indian inventions.

The fact that a spice-averse culture such as Japan has adapted its own version of the curry sauce is a testament to the dish's immense appeal and undeniable deliciousness. In fact, the Brits have done the same. Of course, only the Japanese would find a need to tone it down a bit, making a mild or sweet version to suit their own delicate palates.

Every Japanese kid has had the curry that comes in the Glico box (yes, that's the same Glico company that makes the world famous Pocky sticks -- now offered in more than a dozen flavors). You just heat up some onion, chicken, carrots, potato and water in a pot then throw in the cubes of Glico curry roux, and you magically end up with a thick, creamy stew that tastes brilliant with a bowl of white rice.

For decades I have made Japanese-style curry in this way, never realizing how absurdly easy it is to make my own "karee" (カレー) roux, even under certain dietary restrictions. Better yet, this means I can also have fun customizing the flavors.

[Note to AP: This is an Option #2 recipe.]

Japanese-Style Curry
Serves 6-8

2½ Tbsp curry powder
½ cup oat flour
4-6 Tbsp light olive oil

2 chicken breasts, skinned, deboned and cubed
1 medium onion, sliced
2 small carrots, coarsely chopped in rounds
2 cups okra, stem caps removed
1 tsp grated fresh ginger
1 tsp minced garlic
2½ cups vegetable or chicken stock
½ Tbsp curry powder
½ tsp garam masala
  1. In a skillet, lightly heat the 2½ Tbsp of curry powder and oat flour over medium heat for about a minute.
  2. Add the olive oil and rapidly stir it into the dry ingredients. If necessary, add more oil only until just enough to yield a brown paste. Heat the paste through, stirring constantly to avoid burning. After a minute or two of stirring, remove from heat. Set aside.
  3. Throw into a large pot the chicken, onion, carrots, okra, ginger, garlic and stock. Bring to a boil and immediately lower the heat to a simmer.
  4. As the pot simmers, skim off any foamy scum that forms at the surface and discard. The scum consists of impurities -- mostly from the chicken -- that have floated up. Don't let the scum get mixed back into the liquid because it will impact the taste.
  5. Add the remaining curry powder and the garam masala to the pot.
  6. Mix in the paste from the skillet and gently stir the pot.
  7. Continue simmering until the stew becomes thick and creamy, at least 30 min, or longer to allow the flavors to infuse. Check that the chicken has cooked through.
  8. Serve with rice.

Wednesday, June 24, 2009

Blueberry Yogurt Tartlets

Oddly enough, it started with chicken pot pie.

Still following the rules of a strict diet, I tried to devise a recipe for chicken pot pie without cream, butter, shortening, puff pastry, or any wheat-based flours. The filling was fairly intuitive to figure out. But the flaky, golden pie crust was going to be a bit of a challenge.

Pie crust is basically flour, salt and/or sugar, butter / shortening / lard (i.e. fat), and ice cold water. While I'm not an expert baker, I have made enough pies in my lifetime to have attained a modest mastery of the pie crust. And if there's anything I know about pie crusts is that you don't muck around with the fundamentals. Baking is a science -- getting the chemistry wrong makes the difference between light pastry and rock-hard dough.

As I've said before, non-wheat flours are relatively new to me. I've come to like oat flour in particular because of its nutty taste and grainy, crumbly texture like in shortbread. I decided that a sablée ("sandy") crust would be a palatable alternative to the flaky crust.

However, I wasn't sure if substituting light olive oil for butter would work. So I needed to test it out first in a simpler recipe.

I had seen the Yogurt Tartlets recipe posted on 101 Cookbooks and appreciated the fact that the custard was made of (light) yogurt and eggs -- ingredients that are allowed in the diet -- and yet somehow still turns out creamy even in the absence of heavy cream. Heidi's recipe uses maple syrup as a sweetening agent, but I replaced that with mild honey. I couldn't use her crust recipe because it is full of banned ingredients, so what better occasion to test out the oat flour crust I had in mind?

[Note to AP: This is an Option #2 recipe.]

Oat Flour Pie Crust
Makes 1 large pie crust or 7-8 tartlet crusts

1¼ cups oat flour
¼ tsp sea salt
2 Tbsp light olive oil
4-8 Tbsp chilled water
  1. In a large bowl, combine the oat flour and salt.
  2. Add the olive oil and stir it in a little.
  3. Add one tablespoon of chilled water at a time until all of the dry mixture is clumpy and moistened. The dough should be able to hold its shape when pressed into the shape of a ball. If it feels very sticky or runny then you have added too much water; compensate by adding a small amount of oat flour. If it is too crumbly to form a ball, then add a bit more water.
  4. Cover the dough with plastic wrap and chill it in the freezer for about 10-15 min. Chilled dough is always easier to roll out.
  5. With a rolling pin, roll out the dough on a flat surface until approximately twice the thickness of your pie tin, say the thickness of a dish rag. There's no need to flour the surface, as with conventional pie dough, but you will find that the dough is very crumbly and uneven. Don't worry about tears or holes because you can easily patch them by pressing down or smoothing some dough over the gaps.
  6. With a wide knife or a scraper, lift up what you can of the dough and lower it into your pie tin(s). Gently press down the dough into every corner of the tin and cut off the excess from the rim. Patch any holes. You can skip Step 5 and opt instead to press a wad of dough into the tin and smoothing it out by hand. However, this could yield a crust of uneven thickness, so beware.
  7. Refrigerate the crusts until ready to fill.

Blueberry Yogurt Tartlets
Fills 5-6 tartlets (I know this is inconvenient, like getting a package of 10 hot dogs with a package of 8 hot dog buns. I will try to adjust the quantities in the next version of this recipe.)

2 eggs
1 cup plain Greek (or Balkan-style) yogurt
¼ cup honey
zest of 1 lemon
1 Tbsp ginger juice (grate a ginger root then squeeze/strain out the juice)
5-6 Oat Flour Pie Crusts (see above) in tartlet tins
1 pint of fresh blueberries (or go wild and try other types of fruit)
  1. Preheat the oven to 350°F.
  2. In a large bowl, lightly beat the eggs.
  3. Add the yogurt, honey, lemon zest, and ginger juice. Whisk thoroughly until well combined.
  4. Fill the pie crusts no more than ¾ to the top. The custard will rise a bit during baking.
  5. Bake 20-30 min or until the crusts look dry and the custard doesn't jiggle too much.
  6. Allow the tartlets to cool.
  7. When ready to serve, top the tartlets with blueberries.

Monday, June 22, 2009

Salmon Chowder

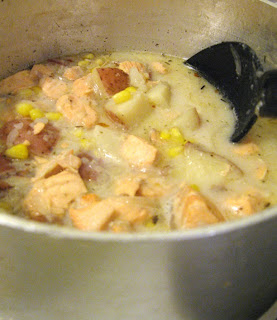
The restricted diet that I am following does not allow for any clams or milk. Nevertheless, I was determined to make a seafood chowder. The clams were easily replaced by cubes of salmon. Replacing the dairy was a sketchy proposition, as it is a key component of any chowder.

I never liked milk substitutes and refused to drink them, despite being lactose intolerant. Soy milk puts me off with its cloying sweetness. Rice milk is thin like water. Fortunately, Natrel makes a brilliant lactose-free milk that actually tastes like milk. However, I've never tried to cook with the milk alternatives, and this was a good opportunity to experiment.

The result was a reasonable approximation to the lighter chowder soups. It could be thickened by pureeing some of the potato in the recipe. [Note to AP: This is an Option #1 dish.]

Salmon Chowder
serves 6

1 large fillet of salmon (roughly 3 portions), skinned and cubed
1 Tbsp light olive oil
1 cup of shallots, sliced
6 small red potatoes (the red potatoes look nicer, but I think white potatoes have a better, smoother texture which is appropriate for this dish), cubed
1 cup of fresh or frozen corn
½ tsp dried thyme
1 bay leaf
⅛ tsp red pepper flakes
½ tsp (or less) sea salt
¼ tsp ground black pepper
3-4 cups of rice milk
2 tsp lemon juice
  1. Boil the salmon cubes in water for 8-10 min or until cooked through. Drain and set aside.
  2. In a large pot, heat the oil at medium heat. Add the shallots and allow them to soften.
  3. Add the potatoes to the pot until heated through.
  4. Add the remaining ingredients to the pot and bring to a boil. Before it reaches a full, rolling boil, lower the temperature to allow the pot to simmer gently.
  5. Simmer an hour (or longer, if desired) to allow the flavors to infuse and the liquid to reduce.
  6. Serve with a wedge of lemon.

Sunday, June 21, 2009

Favorites: Colombien Supremo Brun

There are probably more varieties of coffee beans than there are hairs on a cat, but I think I can confidently say that my favorite brew is the Colombien Supremo Brun from La Pâtisserie de Gascogne in Montreal.

The Gascogne shops look like French bistros, in keeping with their tradition of importing classic French delicacies to the discriminating connoisseurs of Montreal. They have a good selection of breads, extravagant cakes and pastries, gourmet frozen meals, preserves, candies, chocolates, as well as the fine selection of coffees.

Ohhh the coffees. They are all pretty damned good, but the Colombien Supremo Brun is smooth like a Barry White album. It's mild, so it's not meant for those groggy mornings when you need a jolt of caffeine to slap you awake. But on a slow weekend morning, it is a rich indulgence to breathe in the faintly sweet, almost chocolatey aromas and enjoy the silky beverage with a shot of milk.

Favorites: Apple Mustard

As I've written before, I can't resist a farmer's market. It has an energy and color that stirs my culinary imagination.

My first market visit of the season led me to the Brantview Farms stall. The farm (or I should say "orchard"), located in St. George, Ontario, specializes in a wide variety of beautifully grown apples and apple products. A friend pointed out their English Style Apple Mustard.

It was love at first taste. There is a nice hit of spicy, tangy, and sweet flavors. It is firm, but not overpowering. I've had it as a dip with pretzel sticks and pepperettes, I've used it in sandwiches, I've had it with pork sausages... It's only been two weeks but I am already halfway through the jar. Most mustard containers take me a long time to finish. I have a feeling I'll be back at the market for more.

The good-humored Brantview folks will be at Nathan Phillips Square every Wednesday from June until Thanksgiving. Their other market appearances around Ontario are posted online.

Mini Lemon Poppy Muffins

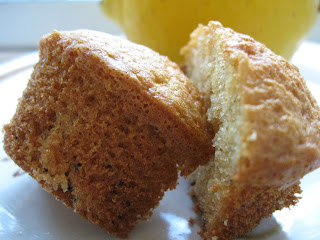
The following is a recipe for Lemon Poppy Muffins that I adapted from a regular muffin recipe, replacing the flour and sugar with oat flour and honey. If you use "uncontaminated" oat flour (i.e. without any trace of gluten) and baking powder, this can be a gluten-free recipe. Make sure to use a mild honey so that the aromas don't overwhelm the light citrus fragrance. This can also work well with lime instead of lemons.

You can make these as regular-sized muffins, but personally I like mini muffins because they're bite-sized and cute. [AP: This is an Option #2 recipe.]

Mini Lemon Poppy Muffins
Makes 24

½ cup oat flour
1 Tbsp baking powder
¼ tsp baking soda
pinch sea salt
3 eggs
¼ cup honey
¼ cup light olive oil
1 Tbsp lemon (or lime) zest
1 Tbsp lemon (or lime) juice (optional)
1 Tbsp poppy seeds
  1. Preheat the oven to 350°F.
  2. In a large bowl, combine the oat flour, baking powder, baking soda and salt.
  3. In a smaller bowl, whisk together the eggs, honey, olive oil, citrus zest and juice (optional).
  4. Add the wet mixture to the dry and mix together until a smooth batter forms.
  5. Stir in the poppy seeds.
  6. Fill the muffin cups until slightly below the rim.
  7. Bake in the oven for 8-10 min or until puffed up and golden.

Happy Father's Day!

It's Father's Day today, and to celebrate the occasion, I sent my Dad an Apple and Walnut Cake via Canada Post. Usually the kind of baked goods that get sent via snail mail are cookies or brownies -- things that kids at summer camps survive on. However, my brother suggested that a cake would be more to our father's taste, so I sought out a suitable recipe.

The Apple and Walnut Cake comes from Nigella Lawson, that saucy, superstar chef from TV. I found it in her "How to Be a Domestic Goddess" cookbook, received as a gift one Xmas. The thing I like about the recipe is that it makes good use of walnut oil (in place of butter) and the end result is a dense, solid cake that can survive for a few days without refrigeration and will withstand the abuses of the postal system.

A wedge of the cake would have been more photogenic, but I couldn't exactly take a piece out of it then mail it to my Dad. My brother reports that the cake has turned out well, although he claims a piece of walnut may be stuck somewhere in his throat. That's what happens when you don't chew, bro.

Monday, June 15, 2009

Anyone Can Cook

I have been profoundly inspired by this man: Mick Trueman of South Yorkshire, England.

He is not a professional chef. He has not inked any best-selling cookbooks. He's not a food writer or a renowned food critic.

Mick, 51, is a coal miner.

So what the hell am I writing about him for? What does he have to do with food or cooking?

My introduction to Mick "the Miner" was on superstar chef Jamie Oliver's most recent TV series, "Jamie Oliver's Ministry of Food", now showing on Canada's The Food Network.

Oliver, that darling of cooking shows, has long been a crusader for improving nutrition and food awareness in his native England. English cuisine -- an oxymoronic term for some -- already suffers from a sullied reputation. Artery-clogging fish and chips, waist-expanding bangers and mash, salty kippers and cholesterol-laden eggs for breakfast, liquor-drenched plum pudding are all tasty inventions for sure, but none of it qualifies as haute cuisine, never mind healthy. It is by unfortunate extension that the Brits are the butt of fat jokes and especially bad teeth jokes (think "Big Book of British Smiles" which the dentist on "The Simpsons" shows to children to terrorize them into taking dental hygiene more seriously).

Jamie Oliver first tried to tackle the national school system, encouraging school cafeterias to prepare healthy, cost-effective meals for children instead of taking the easy (some say lucrative) way out by selling pre-packaged junk food. Now he is trying to take on one town at a time, pitching his "Pass it On" idea: if you teach two people how to cook something easy, delicious and healthy, and if each of the two taught two other people, and if those people taught other people, ... eventually a whole community could learn it. Then maybe, just maybe, it would inspire them to start cooking their own meals using fresh local ingredients, instead of resorting to a diet of take-outs, frozen dinners, potato chips, and other deplorable trash.

To test his theory, he recruited a horde of burly, skeptical blokes from a football (er, "soccer" to us North Americans) game who had never cooked before in their lives. Mick "the Miner" was one of the first two men selected to be taught by Oliver himself: a fast, savory, one-pan recipe for prosciutto-wrapped chicken breasts, seared asparagus spears drizzled with lemon juice, and a crisp side of salad. Click here to view a video of Mick "the Miner" passing on the recipe to two other men as Jamie Oliver looks on.

When asked, Mick had initially declared that cooking was for "poofs" (that's derogatory English slang for "gays"). His dutiful wife cooked for him every day, which seemed a foregone conclusion for a man who assumed it was "woman's work" anyway. Not once in his life had he picked up a frying pan, let alone cooked a whole meal.

Yet as you can see in the video clip, Jamie Oliver's experiment marked a startling revelation and transformation for Mick. He later says to Oliver that cooking that first meal was probably one of the most significant moments of his life: "It was like Picasso had walked into my life and taught me how to paint". The way Mick beams with utter joy and a rich sense of accomplishment every time you see him cook is incredibly infectious. I catch myself grinning ear-to-ear whenever he's on the screen. His wife is touched and amused, trying to stay out of his way in the kitchen and watching him with adoration. "It's incredibly romantic," she says, and you can't help but agree.

After the experiment, Oliver and camera crew followed Mick to the coal mines to see the kind of searing, filthy, back-breaking work that these tough men endure. Apart from the cultural chauvinism about cooking, it became blatantly obvious why these boys wouldn't want to cook after a long, brutal day in the claustrophobic darkness.

Yet Mick has flourished and grown to absolutely love the culinary arts. Just weeks later, he's at home, cooking a pasta dish with peas, ham and a lemon dressing for his family and Jamie Oliver. Mick is fearless, confident and bubbling with enthusiasm over the flavors he has orchestrated for his audience. Oliver asks for seconds. As the celebrity chef leaves, he lets Mick know that in the past 10 years, he has been invited to a home-cooked meal only 5 times -- this being the 5th and a great honor.

Watching Mick "the Miner" is like seeing that thing you love through a fresh pair of eyes that is still in the midst of falling in love. Thank you Mick for your wonderful attitude and spirit!

Sprouting with Joy

I love sprouts. They add a wonderful crunch and herbaceous character to salads, soups, sandwiches, stir fries and on and on. Yet North American supermarkets tend to stock only two kinds: the mung bean sprout commonly found in fast food stir fries, and the grassy alfalfa. Maybe if you're lucky, you'll find pea sprouts at a high end grocery. It's frustrating to read Japanese cooking magazines which feature recipes that incorporate a wide range of sprouts, very few of which I can buy here.

So it was a delight to stumble across a dozen or so (safe) sprouting bean varieties sold in pouches at a health food store. The instructions seemed easy enough. I picked up a packet of Mumm's daikon seeds for my first sprouting attempt.

All I needed was a wide-rimmed jar and some mesh netting fastened to the jar opening with some elastic bands. A teaspoon of seeds were put in. They were soaked for a few hours. Then they were rinsed and drained twice a day, using the mesh as a sieve. In less than a week, I had long, stringy daikon sprouts filling up most of the jar.

Although I expected it, it was still a bit of a surprise that the sprout had so much of the daikon flavor, even in the plant's infancy. I suppose the essence of a thing will usually be present from birth.

I need to get a bigger jar.

Easy Veggie Chili

Here is a meatless chili recipe I devised for the restricted diet. It tastes better the longer you let it simmer. For those days when you have the time but don't want to expend too much effort...

Easy Veggie Chili
serves 6-8
[Note to AP: This is an Option #1 recipe]

½ cup olive oil
4-5 shallots, sliced
1 green bell pepper, seeded and diced
1 red bell pepper, seeded and diced
1 zucchini, seeded and diced
1 can (32 oz) can chickpeas, rinsed and drained
2 large tomatoes, seeded and diced
1½ cups tomato juice
2 Tbsp chili powder
1 Tbsp fresh oregano or ½ tsp dried oregano
1 Tbsp fresh basil or ½ tsp dried basil
1 tsp ground cumin
2 Tbsp fresh cilantro, coarsely chopped
sea salt, black pepper and cayenne to taste
  1. In a large pot, heat the olive oil over medium heat.
  2. Add the shallots and heat until softened (but not browned).
  3. Add the bell peppers, zucchini and chickpeas until just heated through.
  4. Add the tomatoes, tomato juice, chili powder, oregano, basil, and cumin and stir until everything is evenly mixed.
  5. Lower the temperature, cover the pot, and allow to simmer gently for at least 30 min. Stir occasionally. I let it simmer for a couple of hours, which infused the flavors more intensely.
  6. Remove the chili from heat and add the cilantro and seasonings.

Sunday, June 14, 2009

Foodie 101

This is the 101st blog post here at "Cooking a Book". In the spirit of the site's thirst for exploration and experimentation, I've decided to write about my latest discovery: flat rice.

Depending on which culture or region you consult, it's called rice flakes, flattened rice, beaten rice, Aval/Avval (Malayalam), Poha/Pauwa (Hindi), Atukulu (Telugu), and so on. Whatever you call it, it is popular across India, Bangladesh, and apparently Vietnam -- the packet of sweet green flat rice I purchased at my local Chinese grocery was a Vietnamese import. I had no idea what it was; I just liked the look of it, so I bought it.

Flat rice is essentially rice grain that has been de-husked and flattened into flakes. All recipes that I've seen for it start by soaking the flakes in liquid, usually water or milk. It can then be boiled (which turns it into a gooey mush that can be molded into dumplings, or made into a porridge/soup) or fried along with other ingredients. Flat rice is also apparently a highly digestible form of grain and frequently recommended as a means of combating dysentery -- when you're traveling through India, for instance, and have trouble adjusting to the local food and water. It is also lower in carbs than regular rice, so dieters take note.

Just for fun, I threw a handful of these flakes into my rice cooker along with my generic calrose rice. I was expecting to see plump green grains speckled across the white rice, but instead I was surprised to find dissolved green spots on the calrose, as if someone had dribbled green food coloring onto white rice. It's easy to see how flat rice can be used to make doughy dumplings when soaked in enough liquid.

I can't wait to fry up a batch and see how it turns out. Stay tuned.

A Taste of the Caribbean

If there is anything I lament about the house I bought almost a year ago, it's that my neighborhood isn't a gourmet hotspot. In the past, I've had the privilege of living in apartments that were close to, or directly above a fantastic foodie shop or eatery. Now, there is little more than a reasonably stocked green grocer two blocks away and a decent Vietnamese restaurant around the corner. Good luck trying to find cheeses not made by Kraft, organic meats, or a fresh baguette.

The one roti/jerk chicken place I liked folded shortly after I moved in. It took several months for a replacement to fill the location, but now there is a small bakery there that offers cakes, cookies and other sweets from the West Indies. The store owners need to improve their shop layout and address the complete absence of a window display. But I truly hope that their business will thrive and expand my dietary repertoire.

Recently, I purchased some coconut turnovers (above) and a wedge of cassava cake (below).

The turnovers had a light and fluffy dough, stuffed with a spiced coconut mixture. There were a couple of days when that was all I had for lunch and it was incredibly filling as well as energizing.

The cassava cake was a bit of a leap for me. I've always seen cassava on grocery shelves ("it looks like a waxy sweet potato," was how I once described it) but never knew what to do with it. I hadn't realized that it is the third largest source of carbs in the world, or that cassava root flour is used to make tapioca. Recipes for it range from the West Indies, to South America, to East Asia , to Africa. Interestingly, Googling "cassava cake" brought up a bunch of Filipino recipes.

I liked how thick and moist the cake was. I'm sure the sweetness came from sugar or condensed milk rather than the cassava, but I can easily see its application in other recipes that call for a rich, heavy texture. Much to my chagrin, one of my cats ate half of it while I wasn't looking. Baaaaad cat.

My Shu Mai

Not long ago, I was watching Episode 36 of "Diary of a Foodie" which focused on "Fine Fast Food", i.e. cheap, quick eats across the globe that are good enough even for serious gourmands despite their pedestrian origins. One of stops included a Hong Kong noodle shop known for its wonton. In fact, its recipe is considered to be the perfect wonton.

My brother is the one in the family with an affinity for wonton, but I still found myself desperately yearning for some wonton of my own.

The hitch is, I am still following the rigid rules of a restricted diet, not so much for my own benefit, but to force myself to think more creatively in the kitchen. The diet doesn't let me combine meat with any forms of rice or wheat. Wonton or potsticker wrappers are of course made of rice or wheat flour.

My solution was to use collard greens as wrappers. The leaves are broad enough to wrap around a reasonably-sized dumpling. They are thick and hardy -- able to withstand a lot of handling and heat. When roasted, they caramelize a bit and yield a slightly sweet, mildly seaweed-like flavor.

My initial thought was to call them "Wanton Wontons" until I realized that my wrapper substitution would work better (and look better) in the form of shu mai. So here is the recipe for "My Shu Mai". If you come up with a better, cheekier name, please share!

My Shu Mai
Makes 24 dumplings
[AP: This is an Option #2 recipe]

1 package (approx 350-500g) ground turkey or chicken
1 egg
2 scallions
1 tsp rice vinegar
½ tsp sesame oil
¼ tsp sea salt
¼ tsp ground black pepper
2-3 Tbsp plain yogurt
⅓ cup rolled oats, ground up coarsely
6-12 large leaves of collard greens, stalks removed

NOTE: You will need a mini-muffin pan, which will help the leaves keep shape and are the perfect size for shu mai.
  1. In a large bowl, combine the ground meat, egg, rice vinegar, sesame oil, sea salt, and black pepper.
  2. In a smaller bowl, mix the yogurt and oats until it has the consistency of thick oatmeal. If too dry or crumbly, add more yogurt one spoonful at a time. If too liquid, add more oats a small amount at a time. This is the restricted diet's version of a panade: normally a paste made of milk and bread which is added to hamburgers, meat loaves, and meat balls so that they turn out tender and juicy.
  3. While the mixtures in the two bowls sit and marinate, cut round wrappers (approx 3" in diameter) out of the leaves of the collard greens. A small ramekin worked for me; you may have cookie cutters, cups or other round objects that you can trace around with a paring knife. Avoid the thick central veins of the leaves because it will be difficult to bend or fold around the dumpling fillings. Cut out 24 wrappers.
  4. Add the oat mixture to the meat mixture and blend until all ingredients are uniformly distributed.
  5. Preheat the oven to 375°F.
  6. If your mini-muffin pan isn't sufficiently non-stick, then lightly grease each slot with oil, butter, or whatever you prefer.
  7. In each slot of a mini-muffin pan, push in a collard green wrapper, and fill it with about 1 Tbsp of the mixed ingredients. Don't be concerned if a wrapper doesn't stay in its slot on its own; the weight of the filling will press it down. Don't stuff the filling past the edges of the wrapper.
  8. Put the pan in the oven and bake 20-30 min, or until the interior temperature of the dumplings reach at least 170°F.
Serve on their own or with chicken broth and vegetables (such as mushrooms, herbs, etc.).

Tuesday, June 9, 2009

Life Without Chocolate

This is Week 2 of my culinary challenge. One of the food items banned from the prescribed diet is chocolate. I know, I know... so many of us are drooling choco-holics who become choco-gasmic over a thick wedge of flourless chocolate torte, or a fragrant piece of Belgian chocolate truffle. The idea of being sentenced to an existence without chocolate borders on the cruel and inhumane.

To add salt to the wound so to speak, sugars -- both brown and white -- are also banned from the diet. How on earth does one still enjoy life without at least one sliver of sweetness?

That's when I remembered my very own Azuki "Brownie" Cheesecake recipe. It's a "brownie" without chocolate. It's the first semi-elaborate dessert recipe that was entirely my own creation and it was delicious to boot. Those who know me realize that I am the last person to toot my own horn, especially about my culinary abilities. For me to flaunt this success is an indicator of my absolute confidence in its delights.

If you stop to think about the root of chocolate (cacao) it begins with a bean. While the cacao bean is rather bitter -- biting into one is like gnawing on coffee grinds -- there are plenty of other bean varieties that are naturally sweet. Black beans are often used in the West as an alternative to chocolate in dairy-free dessert recipes, especially since it imparts a chocolate brown color when mashed. However, the sweet bean that is a staple across Asian kitchens is the azuki (or adzuki, or aduki) bean. It is a red bean that, IMHO, is equal to chocolate in its depth of flavor and versatility.

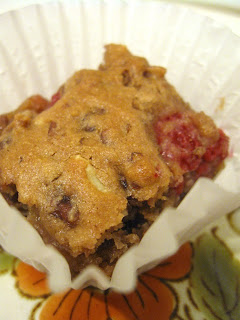
The cream cheese layer from my previous recipe had to be omitted due to further restrictions in the diet. Which left me with a rather dense, if lonely-looking layer of "brownie". It seemed necessary to add something bright to the mix. Raspberries were the first thing that came to mind, and so in they went. Walnuts would have been the ideal accompaniment to the azuki flavor, but the diet doesn't allow me to combine the two in the same dish. So I settled for almonds.

Azuki Raspberry "Brownies"
Yields 16 squares

1 can (approx. 520 g) Azuki beans*, mashed coarsely
½ tsp sea salt (unrefined) or less if preferable
½ cup oat flour, sifted
1 Tbsp baking powder
½ cup almonds, chopped or crushed
1 cup (½ pint) fresh raspberries, or thaw out frozen ones if necessary

*Note: some canned Azuki beans in Asian groceries have sugar and/or corn syrup added to them. If you are watching your sugar intake, check the label and pick a can that has the least amount of additives in the ingredient list, or use plain beans and control how much sweetener you add to it. However, my personal preference is to use the canned, "light" versions of the sweetened, whole (not mashed) Azuki beans. They are called Ogura-an (小倉餡) or Tsubu-an (粒餡).

1. Preheat the oven to 350°F.

2. Mix everything but the raspberries in a large bowl until well-combined.

3. Gently fold the raspberries into the batter, trying not to squash any of them.

4. Line a 9" square baking pan with parchment paper. Let about an inch of the paper to overhang from the edges of the pan -- this will make it easier for you to lift the cake out of the pan when it is ready.

5. Pour the batter into the pan.

6. Bake for 30 min or longer, depending on how soft you like your brownies. Note that as with any brownie recipe, there is a tendency for the cake along the rim of the pan to become spongey and bread-like in texture, whereas the middle pieces will tend to be more gooey like fudge. There's no right or wrong to this: it is entirely up to you. If you don't like a fudgey brownie, then jiggle or tilt the pan to see if the centre is still soft. If it is, the batter hasn't set, so leave it in the oven for another few minutes before you check it again.

7. Allow the cake to cool on a rack before trying to remove it from the parchment or trying to cut it.

[AP: This is an Option #2 recipe.]

Monday, June 1, 2009

Poached Chicken and Wild Rice Salad

Someone I know is dealing with a restricted diet that, incredibly, restricts almost all kinds of meats except for white chicken meat, white turkey meat, and pheasant/quail. Given that the latter are not readily available at the neighborhood supermarket, it boils down to the first two choices.

Another painful restriction is the banning of any kind of frying. With the early days of summer upon us, it's hard to imagine not BBQ-ing or at least frying meat. (My apologies to vegetarians and vegans everywhere.)

The solutions that came to mind were to poach, braise or stew those meats. Poached chicken -- if done right -- can be a delightful component of a summer lunch. Unfortunately, too many people make the mistake of over-cooking the meat, ending up with a rubbery, tough, and unpalatable piece of crap. So, my recipe instructions below leverage some of the research I've done regarding poaching techniques.

Poached Chicken and Wild Rice (or Quinoa) Salad
Serves 4-6

1 cup wild rice [Note to AP: I noticed after the fact that this should have been quinoa to make it a purely Option #2 recipe... OOPS]
2-3 chicken breast fillets, boneless and skinless (the number depends on the size of the fillets)
2 lemons
1 can (19 fl. oz.) red beans, drained and rinsed
2 green onions, chopped
½ cup almonds (raw or lightly dry roasted, as desired)
1 cup baby spinach (optional)
1 cup Almost Mayo Sauce

1. Add the wild rice (or quinoa) to a pot with the amount of water recommended on the package. Bring to a boil then lower the temperature to a simmer. Cover the pot with a lid and cook for the recommended length of time.
2. Slice one of the lemons into thick rounds. In a wide pot or skillet, lay down a single layer of the lemon slices. Place the chicken breast fillets on top of the lemon slices. Add just enough water to submerge the chicken. Weigh down the chicken with the lid of a smaller pot. Bring the water to a boil, then lower the temperature to a simmer. Cook until the internal temperature of the meat reaches at least 165°F (73°C), or until the interior is no longer pink. This may take anywhere from 5-20 minutes. The lemon slices keep the meat from overheating at the bottom. Shallow poaching (as opposed to poaching in lots of liquid) prevents the meat from losing flavor or moisture.
3. Either shred the meat by hand or chop them into thick slices. Place the meat in a large bowl. Add the red beans, chopped green onions, the zest of the remaining lemon, 1 Tbsp of the lemon's juice, and almonds (optionally the baby spinach too). When the wild rice (or quinoa) is ready, add to the bowl and mix all the ingredients gently.
4. To serve, provide the Almost Mayo Sauce on the side or drizzled on top.

White Bean Mash

The "White Bean Mash" from Marie Claire's "Easy" cookbook is one of my all-time favorite dips/spreads. I never knew how much I could love white beans until I had them this way.

I thought that this would be a quick, easy and flavorful addition to a restricted diet. However, white beans are not allowed to be combined with garlic for the patient I had in mind. I also felt that the original recipe called for too much olive oil. The following is my modified version with some proposed ingredient alternatives:

White Bean Mash

1 can (19 fl. oz.) white beans, drained and rinsed (or try 1-2 boiled or roasted parsnips)
2 shallots
½ - 1 tsp sea salt
¼ cup olive oil
1 Tbsp fresh thyme (or ¼ tsp of dried thyme)

1. Blend everything together in a bowl until it has the consistency of mashed potatoes.

Use as a spread, dip or serve with salmon, potatoes or wild rice. [AP: This is an Option #1 recipe and the serving suggestions are also Option #1.]

Almost Mayo Sauce

Not being able to use mayonnaise or most kinds of dairy in a creamy sauce is a major setback for a cook. The only options at my disposal are yogurt and eggs. Yogurt might work with the beet and potato salad, but it is no substitute for mayo.

Mayonnaise gets its characteristic flavor from eggs. For the novice, properly emulsifying the eggs and oil can get tricky -- batches of mayo have been ruined this way. One clever alternative I stumbled across in The Australian Women's Weekly "New Salads" cookbook uses hard-boiled eggs (not raw) to start a mayo-like dressing. This turns out to be a much more forgiving alternative. Their recipe for "Creamy Oregano and Caper" dressing involved a couple of other ingredients that were not suitable for the restricted diet I spoke about earlier, so here is my simplified version. [AP: this is a Neutral recipe. You can add fresh or dried herbs to it, but that can change the food category.]

Almost Mayo Sauce

2 hard-boiled eggs
2 Tbsp lemon juice (less if you don't like it too tart)
1 clove garlic
1/3 cup olive oil

1. Blend the eggs, lemon juice and garlic together.
2. With the blender still going, pour in the oil in a thin, steady stream until the sauce reaches a creamy consistency. Don't go beyond that point because your sauce may start to separate and break down.